SonarCloud is the hosted offering of SonarQube, provided by SonarSource.
In this post we will look at how to run a Sonar code quality scan on a Salesforce project using automatic analysis and GitHub Actions. The example in this post is focused on Apex classes and triggers, but SonarCloud also supports scans of aura components, lighthing web components and Visualforce pages.
Prerequisites
- Salesforce project managed in source control with access to a CI/CD tool. The example uses a project on GitHub with GitHub Actions
- Salesforce org with the DevHub feature enabled (developer or enterprise and up). Sign up for a free developer edition org here.
- Salesforce CLI installed and authenticated to a DevHub org
Automatic Analysis with GitHub
This is the easiest and fastest way to get started. Note that at the time of writing this post automatic analysis is only available with projects hosted on GitHub.
When you first import a project, SonarCloud will analyze your default branch. Once activated, automatic analysis will trigger a new analysis after each new push on the default branch and after any pull request activity.
Step 1: Navigate to SonarCloud
Navigate to sonarcloud.io and log in with your GitHub credentials
Step 2: Authorize SonarCloud to Access GitHub Projects
If your GitHub account is associated with a GitHub organization and the organization has already been imported into SonarCloud, then SonarCloud will display a list of projects your GitHub account has access to when you go to import a new project.
If you are using a personal GitHub account, you can authorize SonarCloud to import project owned by your personal GitHub account. Note that if you opt for the free plan, only public GitHub repositories can be imported.
The process of granting SonarCloud access to GitHub projects is called “Create new organization”. Can you initiate this process from “+” icon in the top navigation, or during the process of importing a new project.
Step 3: Import a GitHub project
Click the “+” icon in the top navigation and select the option to “Analyze a new project”.
Sonar Cloud will automatically display a list of the repositories available based on the organizations created within SonarCloud, your SonarCloud plan and the projects your GitHub account has access to.
Follow the setup wizard and note the step you must take in creating a secret in your GitHub repository:
- Add the SONAR_TOKEN secret to your repository
Step 4: Configure Analysis Parameters using SonarCloud UI
Most project analysis settings can be configured in three different places: in the UI, in a configuration file, or on the command line.
One of the main benefits of automatic analysis is that you don’t have to maintain configuration files in your repository, or build a custom CI job, so the ideal approach in this case is the configure the parameters in the SonarCloud UI.
To configure analysis parameters via the the SonarCloud UI, navigate to ProjectName -> Administration -> General Settings
Update the following settings (assumes project is structured in metadata api format):
- Analysis Scope
- Coverage Exclusions:
- src/classes/*__* (classes from managed packages)
- **/*Test.cls (naming convention for Apex tests is to end file name in “Test”
- Exclusions
- **/*Test.cls (exclude test classes from Sonar rules)
- Coverage Exclusions:
- Languages -> Apex
- File Suffices
- .cls
- .trigger
- Path to coverage report
- tests/apex/test-result-codecoverage.json
- File Suffices
- Pull Requests
- Integration with GitHub
- Enable summary comment: true
- Integration with GitHub
Step 4: View the Results of the Integration
SonarCloud will conduct an initial analysis of the default branch and will run a subsequent analysis each time a pull request is opened and each time a commit is made to the default branch.
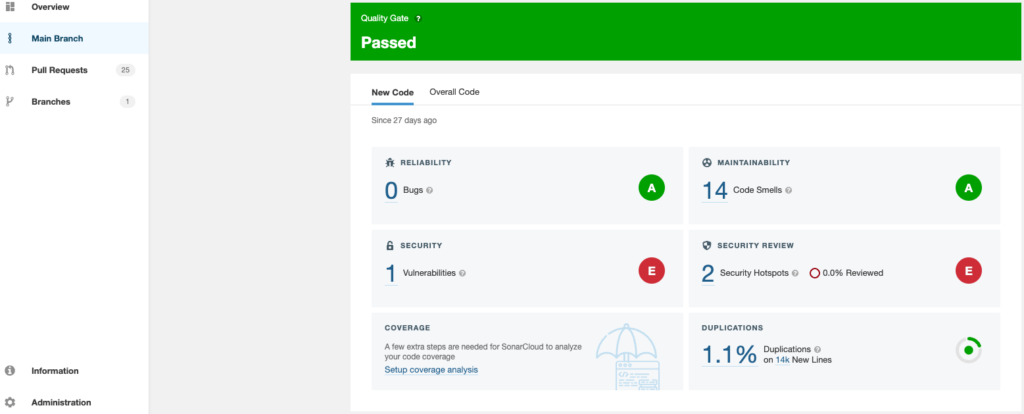
As you can see the Sonar analysis will provide great information about improvement opportunities and how quality is changing over time. One data point that is missing with this setup is code coverage. We’ll add that in the next section.
Add Test Code Coverage with GitHub Actions
If your project does not meet the requirements for automatic analysis, or if you want to include Apex code coverage information in the SonarCloud dashboard, then you will need to run the analysis with a CI tool, such as GitHub Actions.
Step 1: Configure Analysis Parameters using Properties File
In this scenario we will use the sonar-project.properties file, which should be saved to the root directory of the project, to set the configuration parameters. Note that this example configuration file assumes the project is structured in DX format.
sonar.projectKey={add SonarCloud project key}
sonar.organization={add SonarCloud organization name}

# This is the name and version displayed in the SonarCloud UI.
sonar.projectName=My SonarCloud Demo Project
#sonar.projectVersion=1.0

# Path is relative to the sonar-project.properties file. Replace "\" by "/" on Windows.
sonar.sources=force-app/main/default

# Exclude unit tests from scans
sonar.exclusions=**/*Test.cls

# Comma-separated paths to directories containing test source files.
sonar.apex.coverage.reportPath=tests/apex/test-result-codecoverage.json

# Encoding of the source code. Default is default system encoding
#sonar.sourceEncoding=UTF-8
Step 2: Set Up GitHub Environment Variables
For this example, let’s assume that the main branch is the default branch and that whenever we are adding a commit to the branch we are deploying the changes to a sandbox environment called “UAT”.
Authenticate Salesforce CLI to the environment that you want to use as this “UAT” environment. For the purposes of this example, you can use a developer edition account, such as your DevHub org. Run the following command and copy the value of the ‘Sfdx Auth Url’ key
sfdx force:org:display -u {org-alias} --verboseIn GitHub, navigate to Settings -> Environments and create an Environment called “UAT”. Create a new environment variable called SFDX_AUTH_URL. Paste the value that you copied from the output of the Salesforce CLI command above.
Step 3: Create GitHub Action for Changes to the Main Branch
Create a file called ci-main.yml in the following directory of your GitHub project: .github/workflows
Add the following text to the file
# Workflow that manages the CI process for the main branch and corresponding Salesforce environment called "UAT" in this example

name: CI Main

# When the Workflow should run
on:
  workflow_dispatch:
  push:
    branches:
      - main
    paths:
      - "force-app/**"

# Jobs to be executed
jobs:
  deploy-source:
    runs-on: ubuntu-latest
    # Restrict job to access only secrets and protection settings scoped in the Develop environment
    environment: UAT
    steps:
      # Checkout the source code
      - name: "Checkout source code"
        uses: actions/checkout@v2

      # Install Salesforce CLI
      - name: "Install Salesforce CLI"
        run: |
          wget https://developer.salesforce.com/media/salesforce-cli/sfdx/channels/stable/sfdx-linux-x64.tar.xz
          mkdir ~/sfdx
          tar xJf sfdx-linux-x64.tar.xz -C ~/sfdx --strip-components 1
          echo "$HOME/sfdx/bin" >> $GITHUB_PATH
          ~/sfdx/bin/sfdx version

      # Store secret for develop sandbox
      - name: "Populate auth file with SDFX_AUTH_URL secret"
        shell: bash
        run: "echo ${{ secrets.SFDX_AUTH_URL}} > ./ENV_SFDX_URL.txt"

      # Authenticate environment in order to deploy
      - name: "Authenticate Environment"
        run: sfdx auth:sfdxurl:store -f ./ENV_SFDX_URL.txt -a uat-environment

      # Convert source to metadata format
      - name: "Convert Source Code to Metadata Format"
        run: sfdx force:source:convert -d mdapioutput

      # Deploy to target environment
      - name: "Deploy to Environment"
        run: sfdx force:mdapi:deploy -d mdapioutput/ -u uat-environment -w 100

      # Get Apex test results
      - name: "Run Apex tests"
        run: "sfdx force:apex:test:run -c -r json -d ./tests/apex -u uat-environment -w 120"

      # Save code coverage for next job
      - name: "Make report available"
        uses: actions/upload-artifact@v2
        with:
          name: apex-code-coverage
          path: tests/apex/test-result-codecoverage.json # Wildcards can be used to filter the files copied into the container. See: https://github.com/actions/upload-artifact

  sonar-scan:
    needs: deploy-source
    runs-on: ubuntu-latest
    steps:
      - uses: actions/checkout@v2
        with:
          fetch-depth: 0 # Shallow clones should be disabled for a better relevancy of analysis

      # Download the code coverage report
      - name: "Download coverage result from previous job"
        uses: actions/download-artifact@v2
        with:
          name: apex-code-coverage
          path: tests/apex

      # Use Sonar Cloud action with sonar-project.properties to scan project
      - name: "Sonar Cloud scan"
        uses: SonarSource/sonarcloud-github-action@master
        env:
          GITHUB_TOKEN: ${{ secrets.GITHUB_TOKEN }} # Needed to get PR information, if any
          SONAR_TOKEN: ${{ secrets.SONAR_TOKEN }}
Workflow highlights
- Runs whenever there is a push to the main branch in the application directory or can be triggered manually
- Restricts access to GitHub secrets related to the UAT environment
- Installs the Salesforce CLI, authenticates with the environment
- Deploys the changes to the branch, then runs local tests, then downloads the coverage report
- Uses the SonarCloud action to run the SonarCloud scan using the configuration from the sonar-project.properties file
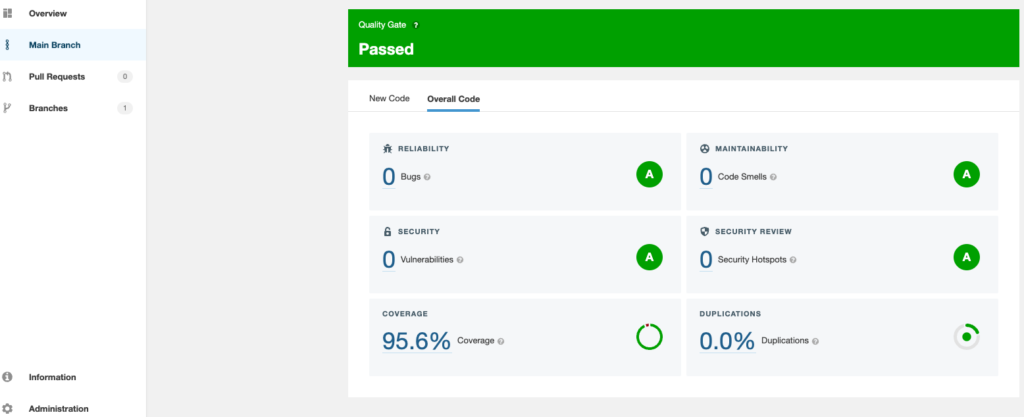
Step 4: View the Results
The code coverage results will be added to the dashboard for the branch in SonarCloud.
Add Quality Badges to the Project
Now that you have set up quality scans and are continually improving the quality of the project, you’ve earned bragging rights! Adding badges to the README.md is a great way to motivate contributors and be transparent about how the project progressing.
In the SonarCloud UI, navigate to Information and view the Badges section. Select the metric you are interested, along with the Markdown format. Copy the auto-generated text and add it to the top of the README.md file in your GitHub project.

Resources
- GitHub Action: SonarCloud Scan
- SonarCloud Documentation: Getting Started with GitHub
- SonarCloud Documentation: Analysis Parameters
- SonarCloud Documentation: Analysis Scope
- SonarSource Community: Generate Test Coverage Reports for Apex


Is source code conversion to mdapi format required for deploying to environment before running the apex test? Will sfdx force:source:push not serve the purpose?