In this post we will explore how to create an API specification and save to the Mulesoft Anypoint platform from the command line so that we can take advantage of the platform’s API management capabilities.
Business Scenario
We are going to create a REST API for a pet adoption agency. The service will help the agency work with data related to people who adopt pets. Below is an overview of the endpoints.
| API | Detail |
| GET /v1/owners/ID | Get detailed information about a pet owner. |
| POST /v1/owners | Add a new owner. |
| GET /v1/owners/ID/pets | Get a list of pets associated with an owner. |
| POST /v1/owners/ID/pets | Associate a new pet with an owner. |
Step 1: Install Anypoint CLI
We will use the Anypoint CLI to deploy the specification to the Anypoint platform. At the time of writing this post, the Anypoint CLI requires Node.js 16 or higher. Commands below have been tested on WSL2 running Ubuntu 20.
# Install Node.js and NPM. Note that Node 16 or higher is required for the Anypoint CLI
curl -fsSL https://deb.nodesource.com/setup_16.x | sudo -E bash -
sudo apt install -y nodejs
sudo apt install npm

# Install the Anypoint CLI core package and default plugins
sudo npm install -g anypoint-cli-v4

# Install additional plugins needed for this exercise
anypoint-cli-v4 plugins:install anypoint-cli-account-plugin
anypoint-cli-v4 plugins:install anypoint-cli-designcenter-plugin
anypoint-cli-v4 plugins:install anypoint-cli-exchange-plugin

# Verify the installation
anypoint-cli-v4 --version
anypoint-cli-v4 plugins --core
Step 2: Authenticate to the Anypoint CLI Platform
There are a number of ways to authenticate the Anypoint CLI to the platform including username/password, client id/secret, bearer token, etc.
There are also several options for passing the authentication parameters to the Anypoint CLI. In this example, we will store our Anypoint client id and secret as environment variables.
First, create an Anypoint platform trial account if you don’t already have an account.
Navigate to Access Manager -> Connected Apps and click “Create App” with the following values
- Name: Anypoint CLI
- App acts on its own behalf
- Scopes
- View Environment
- Design Center Developer
- Exchange Contributor
- Select Context: if using a trial account, select all business groups and environments; you would probably want to be more selective in a paid production Anypoint account
Once you are taken back to the page that lists the connected apps, note the links to copy the Id and Secret to use shortly.
To get the final authentication detail, navigate to Access Manager -> Organization and click on the name of your organization. Copy the Organization Id to use below.
Save the authentication information as environment variables:
export ANYPOINT_CLIENT_ID=myClientID
export ANYPOINT_CLIENT_SECRET=myCLientSecret
export ANYPOINT_ORG=myOrgId

# Verify authentication
anypoint-cli-v4 account:environment:list
Step 3: Create an API Project in Design Center
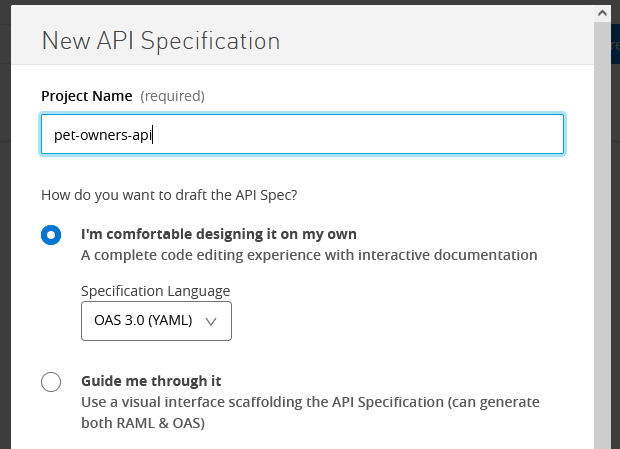
Navigate to the Design Center in Anypoint platform and click the “Create New” button.
Select the options to create a new OAS 3.0 specification in yaml format. Name the project pet-owners-api.
Step 3: Save the OpenAPI Specification (OAS) Locally
Create a GitHub account if you don’t have one already and make sure git is installed on your local machine.
Create a new GitHub project and clone the project to your local computer.
Add a directory called “docs/oas” in the git project. Run the following command to download the specification to your local machine.
anypoint-cli-v4 designcenter:project:download pet-owners-api ./docs/oasThe Anypoint CLI will create several files in the “oas” folder. The specification will be the pet-owners-api.yaml file. Commit the changes to git and push the project to GitHub.
Step 4: Develop the OpenAPI Specification Locally.
Use any text editor or OAS development tool. I like VS Code with the OpenAPI editor plugin. Whatever you use, you’ll want to be able to save the specification file locally in order to manage the specification in source control.
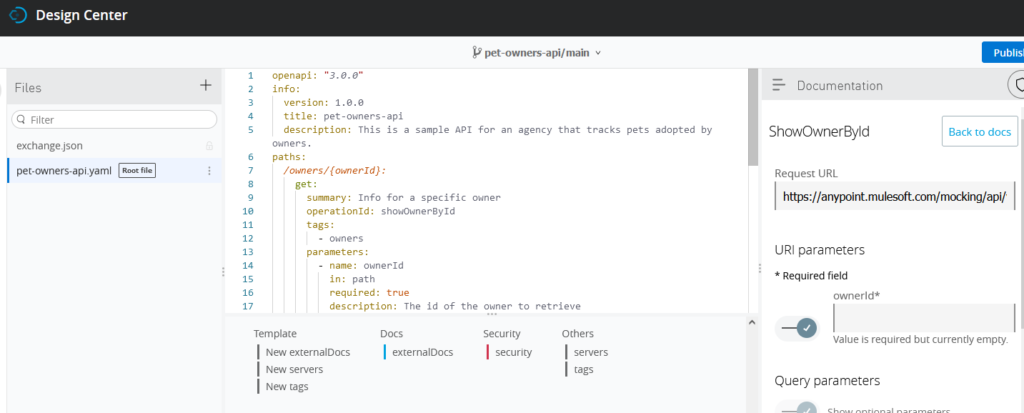
Add the first endpoint to the specification.
paths:
  /owners/{ownerId}:
    get:
      summary: Info for a specific owner
      operationId: showOwnerById
      tags:
        - owners
      parameters:
        - name: ownerId
          in: path
          required: true
          description: The id of the owner to retrieve
          schema:
            type: string
      responses:
        '200':
          description: Expected response to a valid request
          content:
            application/json:
              schema:
                $ref: "#/components/schemas/Owner"

components:
  schemas:
    Owner:
      required:
        - id
        - firstName
        - lastName
      properties:
        id:
          type: integer
          format: int64
        firstName:
          type: string
        lastName:
          type: string
        tag:
          type: string
Save the file, commit the changes in git and push the project to GitHub. Finally, upload the files to the project in Anypoint.
# Upload the local specification to the design center project
anypoint-cli-v4 designcenter:project:upload pet-owners-api ./docs/oas
Navigate to the Design Center in the Anypoint platform and and open your project. You should see the new endpoint.
Summary
Once you add an endpoint to the specification in Anypoint, Design Center will automatically create a mock URL, generate sample code in several languages for calling the mock URL and generate sample responses. Design Center also includes an online editor with OAS auto-suggest functionality.
Using the Anypoint CLI you can develop the specification either locally or from the Design Center and easily keep both in sync with GitHub.
A Note on Anypoint’s GitHub Synchronization Feature
Anypoint platform includes a feature called GitHub Synchronization which will automatically sync changes to the specification from Design Center to GitHub and vice versa. This is a nice feature, which can remove the need to use the Anypoint CLI. However it does have the following limitations:
- The feature only works with GitHub, whereas the Anypoint CLI can be used in the above flow to sync changes to any git hosting provider.
- The feature requires administrator access to a GitHub organization and doesn’t work with individual accounts without a GitHub organization.
- In step 3 above we downloaded the specification from Anypoint Design Center and we were able to select the directory within the project where to save the specification files. The GitHub sync feature saves the files to the root of the GitHub project.
Resources
- Documentation: OpenAPI Specification
- Mulesoft Documentation: Install Anypoint CLI v4
- Mulesoft Documentation: Authenticate to the Anypoint Platform CLI
- Mulesoft Documentation: Anypoint CLI List of Commands
- Mulesfot Documentation: GitHub Synchronization


