In this post, we will explore several options for setting up Kafka on your local computer. Each option provides various benefits and capabilities, so the best option will depend on your needs.
Overview
For each option we will install and run a Kafka implementation locally and we will publish and consume events to test the implementation. The events will include information about pets adopted by new pet owners.
Prerequisites
- Java: Java 8 or Java 11 is required for Confluent Platform; Apache Kafka and Conduktor Desktop also run on Java 17
- Docker: Docker is not used in this post, but there are alternative methods for each option using Docker.
Option 1: Apache Kafka
The first option is to use the open source version of Kafka maintained by the Apache Foundation.
Step 1: Download Apache Kafka
Download the compressed TAR archive file. Once downloaded, extract the file to a convenient location on your local machine.
# Navigate to the Downloads folder and create the destination directory before running the tar command
tar -xzf kafka_2.13-3.3.1.tgz -C ~/Projects/local-apache-kafka

# Navigate to the extracted directory
cd ~/Projects/local-apache-kafka/kafka_2.13-3.3.1
Note that the folder and file names may be different if you download a different version of Kafka.
Step 2: Start Zookeeper and Kafka Services
Open 3 terminal instances and run each of the commands in separate terminal instances.
# Start the ZooKeeper service
bin/zookeeper-server-start.sh config/zookeeper.properties
# Start the Kafka broker service
bin/kafka-server-start.sh config/server.properties
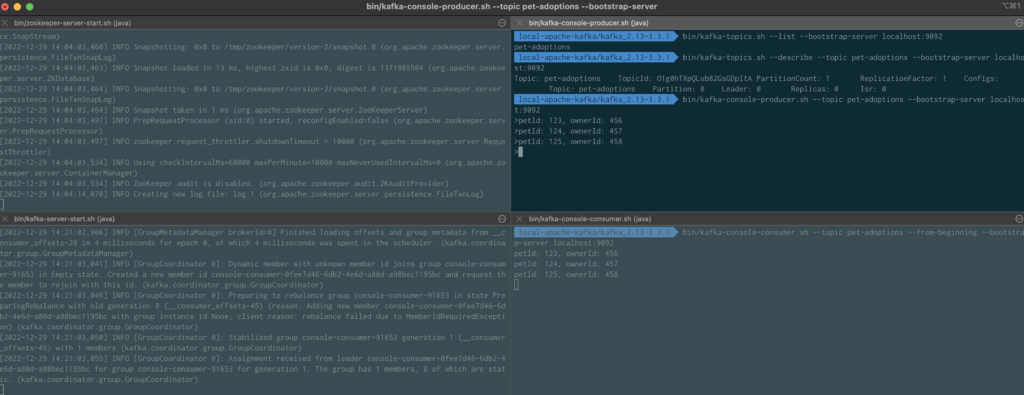
# List topics to verify that the services are running. This command should return no results
bin/kafka-topics.sh --list --bootstrap-server localhost:9092Step 3: Create a Topic with Apache Kafka
Let’s create a topic on the Kafka cluster. Run the following in the terminal instance used to list the topics previously.
# Create the pet-adoptions topic
bin/kafka-topics.sh --create --topic pet-adoptions --bootstrap-server localhost:9092

# List the topics again
bin/kafka-topics.sh --list --bootstrap-server localhost:9092

# Use the describe command to see more information about the topic
$ bin/kafka-topics.sh --describe --topic pet-adoptions --bootstrap-server localhost:9092
Step 4: Publish and Consume Events with Apache Kafka
Apache Kafka comes with producer and consumer clients that can run in the console for testing the broker configuration.
Open another terminal instance and use the console consumer client to subscribe to the topic.
bin/kafka-console-consumer.sh --topic pet-adoptions --from-beginning --bootstrap-server localhost:9092Navigate back to the terminal instance where you have been running the topic commands on the cluster and start the console producer client.
bin/kafka-console-producer.sh --topic pet-adoptions --bootstrap-server localhost:9092Create some new sample events and watch the messages appear in the consumer client near real-time:
- petId: 123, ownerId: 456
- petId: 124, ownerId: 457
- petId: 125, ownerId: 458
Use Ctrl + C to stop running application and services in all terminal instances. Optionally remove the local data, including the messages:
rm -rf /tmp/kafka-logs /tmp/zookeeperApache Kafka Summary
Apache Kafka provides a quick and simple way to get started working with the core Kafka features and the only prerequisite is Java. Apache Kafka is widely used and may be best choice if trying to make local development environment match your organization’s deployed Kafka cluster.
The main downside is that some of the other options provide more features and tools on top of Apache Kafka, some of which we will explore next.
Apache Kafka Resources
- Apache Kafka: Quickstart
Option 2: Confluent Platform
Kafka was initially developed at LinkedIn before the technology became an open source project. Some of the original creators of Kafka formed a new company called Confluent which offers a managed Kafka solution, in addition to a number of tools and features that compliment and add to open source Apache Kafka. Confluent offers a free version of their software for single broker (developer use cases) and self-hosted implementations. We will use the single broker implementation for setting up Confluent Platform locally.
Note that this option requires the $JAVA_HOME variable to point to either Java 8 or 11 installations.
Step 1: Download and Configure Confluent Platform
Download the latest gz archive file. Once downloaded, extract the file to a convenient location on your local machine.
# Navigate to the Downloads folder and create the destination directory before running the tar command
tar -xvf confluent-7.3.0.tar.gz -C ~/Projects/local-confluent-kafka

# Navigate to the extracted directory
cd ~/Projects/local-confluent-kafka/confluent-7.3.0
Note that the folder and file names may be different if you download a different version of Confluent Platform.
Confluent Platform includes a CLI that simplifies interacting with the Kafka cluster. Add the CLI directory command to the computer’s path.
# Set the CONFLUENT_HOME variable
export CONFLUENT_HOME=~/Projects/local-confluent-kafka/confluent-7.3.0

# Add the Confluent Platform bin directory to the system's path
export PATH=$PATH:$CONFLUENT_HOME/bin

# Verify that the Confluent CLI is working correctly
confluent --help
Step 2: Start Confluent Platform
This command will start all of the services that are part of the Confluent Platform, including Zookeeper and Kafka, as well as a number of features that the Confluent software adds to Kafka such as Schema Registry, REST Proxy, ksqlDB and the Confluent Control Center application.
# Note that this command only works with single broker implementations
confluent local services start
Step 3: Create a Topic with Confluent Platform
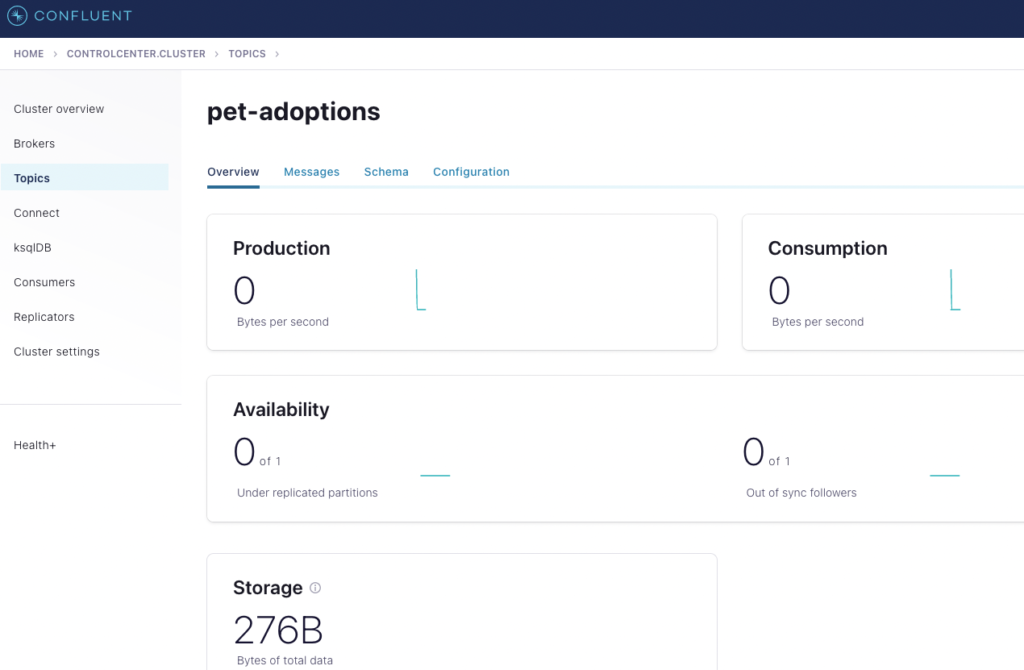
It is possible to create a topic using the built in Kafka shell scripts, the Confluent CLI, or the Confluent Control Center. We’ll use the Control Center in this example to explore one of the unique Confluent features.
Navigate to the Control Center app running on your local machine at http://localhost:9021
Click the controlcenter.cluster tile that displays in the app that loads in your browser.
Navigate to the Topics page and click the “+ Add topic” button. Use “pet-adoptions” for the name and click “Create with defaults” button.
Step 4: Publish and Consume Events with Confluent Platform
Confluent Platform comes with the same Java producer and consumer clients that are bundled with Apache Kafka, but we do not need to add the .sh extensions to run the clients and do not need to specify the path to the executable.
Open another terminal instance and use the console consumer client to subscribe to the topic.
kafka-console-consumer --topic pet-adoptions --from-beginning --bootstrap-server localhost:9092It is possible to produce messages from the Confluent Control Center, but let’s explore the Kafka REST Proxy, which enables posting and consuming messages using any REST client. Open another terminal instance and run the following command to produce the data via the Kafka REST Proxy:
curl -X POST \
     -H "Content-Type: application/vnd.kafka.json.v2+json" \
     -H "Accept: application/vnd.kafka.v2+json" \
     --data '{"records":[{"key":"", "value": {"petId": 123, "ownerId": 456}}, {"key":"", "value": {"petId": 124, "ownerId": 457}}, {"key":"", "value": {"petId": 125, "ownerId": 458}}]}' \
     "http://localhost:8082/topics/pet-adoptions"
You should see the messages appear in the consumer client near real-time.
Use Ctrl + C to stop the consumer application in both terminal instances. Stop the Confluent Platform services as well:
confluent local services stop

# Optionally destroy the instance and any data and customizations you created
confluent local destroy
Confluent Platform Summary
Confluent Platform adds a number of capabilities to Apache Kafka, including
- Schema Registry – centralized message schema management and change governance
- REST API for Kafka – proxy application for interacting with Kafka via a REST API
- ksqlDB Server – interactive SQL interface for stream processing on Kafka
- Control Center – web application for monitoring and administering Apache Kafka and Confluent Platform services
- Access to a library of pre-built connectors
- Confluent CLI – command line tool for interacting with Apache Kafka and Confluent Platform services
- Much more…
Depending on your organization’s Kafka implementation, using Confluent Platform locally may help align your local environment.
Although Confluent offers a free community edition of their software, many of the features require a paid license for running a production grade cluster.
Confluent Platform Resources
- Confluent Documentation: Confluent Platform Licenses
- Confluent CLI Reference: confluent local Commands
- Confluent Documentation: Quick Start for Confluent Platform
Option 3: Conduktor Desktop
Conduktor is a company that focuses on building tools that simplify setting up and managing Kafka and Zookeeper services, including some free tools for developers. One of those free tools is a desktop application that quickly installs and launches a Kafka broker locally and also provides an easy-to-use UI for managing the broker and for creating consumer and producer clients.
Step 1: Download Conduktor Desktop
Download and install the Conduktor Desktop application for your operating system. Once installation is complete, launch Conduktor Desktop.
Select the option to sign up for Conduktor Platform (or log in if you already have an account). Then continue the process to grant Conduktor Desktop access to your Conduktor Platform account.
Note that you will need to verify your email address before you can create a new Kafka cluster.
Step 2: Launch New Kafka Cluster using Conduktor Desktop
In Conduktor Desktop, click the button to “Start local Kafka cluster”. Enter a name, such as “Local Conduktor Kafka” and click the “Download” button next to the cluster version.
Once the Kafka cluster is downloaded, click the blue “Start Cluster” button. This will start Zookeeper and Kafka on your local machine.
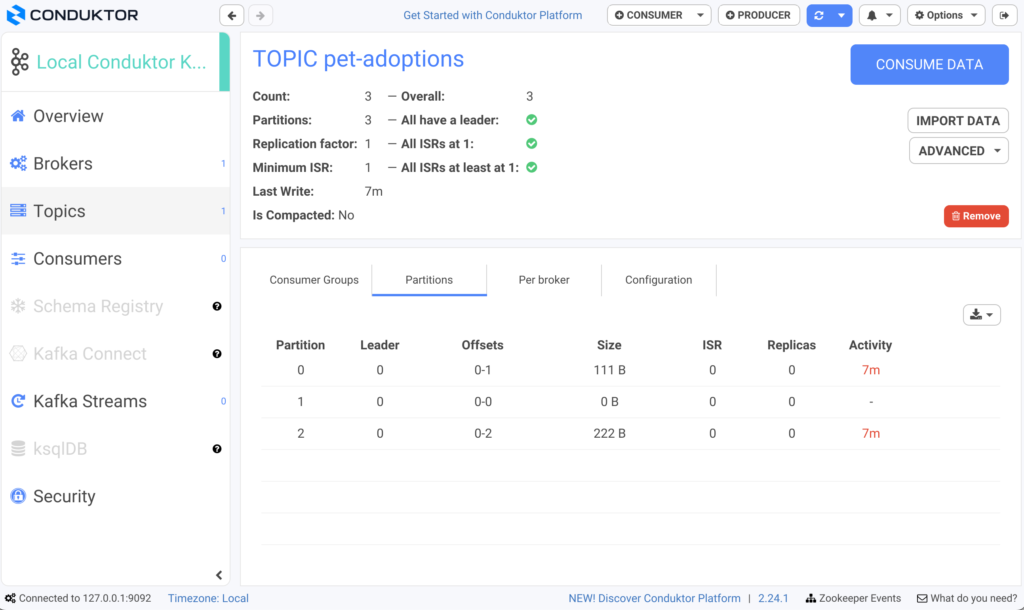
Step 3: Create a Topic with Conduktor Desktop
in Conduktor Desktop, navigate to the Topics page and click the “+ Create” button to create a new topic. Enter “pet-adoptions” for the name. Accept the other default settings.
Step 4: Publish and Consume Events with Conduktor Desktop
If you already installed Apache Kafka, then you can use the Java producer and consumer CLI clients to produce and consume events from the cluster launched by Conduktor Desktop. For this example we’ll use Conduktor Desktop to produce and consumer events to explore the application features.
Click the “Consume Data” button to create a new consumer. This will open a new Conduktor Desktop window. Change the “Start From” setting to “The beginning (earliest)”. Click the “Start” button.
Navigate back to the main Conduktor Desktop window and click the “+ Producer” button at the top of the application. This will open a new Conduktor Desktop window for the producer. Arrange the windows so that you can see both the consumer and producer windows. In the Producer window, select the “pet-adoptions” topic. Enter the following data into the Value field and press “Produce to Topic after each one:
- petId: 123, ownerId: 456
- petId: 124, ownerId: 457
- petId: 125, ownerId: 458
You should see the messages appear in the consumer window in near real-time.
Conduktor Desktop Summary
Conduktor Desktop provides a great way to quickly launch a Kafka cluster locally and simplifies the administration of a Kafka cluster. It also provides visual clients for consuming and producing events which are helpful for understanding the Kafka client options.
At the time of writing this post, Conduktor Desktop will launch Apache Kafka with Kafka Streams and can also launch Confluent Schema Registry, but does not support other Kafka or Confluent services locally. So depending on your needs, this tool may or may not be the best fit for managing your local development environment.
Conduktor Desktop Resources
- Conduktor Desktop Download
- Tutorials: Conduktor Kafkademy
- Conduktor Documentation: Conduktor Desktop
- Best Practice: Kafka Topic Naming Conventions


