Roughly a year ago, I wrote about using VS Code with the Windows Subsystem for Linux (WSL) for Salesforce development. There have been some notable changes since then, including WSL 2, VS Code remote development and the Windows Terminal, which have significantly simplified the approach.
Previously, project files were typically stored on the Windows environment since it was not recommended to edit files in the WSL 1 environment with Windows applications, such as VS Code. The new recommended approach with WSL 2 is to store project files in the WSL 2 environment and use a new VS Code feature called remote development to edit the files.
There are several benefits to this new approach that justify the effort of updating your local setup:
- Previously, we had to maintain Salesforce CLI implementations in both the WSL and Windows environments, including the current version of the CLI and its dependencies, connected Salesforce orgs, etc. With WSL 2 and VS Code remote development, we just have to maintain one implementation.
- Some Salesforce CLI commands require communication between the shell environment and a web browser. Previously, enabling these commands required a fair amount of customization to the WSL environment. Now this functionality works without custom setup.
- Performance of WSL 2 is much faster than WSL 1.
This post demonstrates how to use WSL 2 with VS Code remote development for Salesforce development.
Prerequisites
- Before you begin, make sure you have enabled the Windows Subsystem for Linux. I’m using Ubuntu running on WSL 2 in this example.
- Git is required in the WSL environment in order to support terminal and VS Code functionality related to version control.
- Java 8 SDK or Java 11 SDK is required in the WSL environment to support Salesforce VS Code extensions.
- Salesforce org with the Dev Hub feature enabled (developer or enterprise and up). Sign up for a free developer edition org here.
- OPTIONAL: Install the Windows Terminal – not required, but it’s pretty awesome, so you probably want it anyways.
Step 1: Install the Salesforce CLI in the WSL 2 Environment
Follow the instructions in the Salesforce CLI Setup Guide for installing the CLI in Linux.
I’m using zsh as my shell, and I also had to update the Path variable in my .zshrc file to include the directory where the Salesforce CLI is installed.
Step 2: Connect to a Developer Hub Org and Additional Orgs
The first step in using the Salesforce CLI is to log into a Developer Hub org.
sfdx force:auth:web:login -d -a DevHubThis should open your default browser in the Windows environment and load with a Salesforce login page. Enter your credentials for the org you want to use as the developer hub. After that you can use the sfdx force:auth:web:login command to connect to more orgs and start to deploy and retrieve metadata, work with data, manage users and use all of the awesome features that come with the Salesforce CLI.
When I last wrote about setting up the Salesforce CLI on WSL, customization of the WSL installation was required in order to enable browser communication with WSL, which is necessary for some of the “auth” and “open” CLI commands. Now that step is no longer required!
Step 3: Install VS Code and Extensions
Download and install VS Code for Windows: https://code.visualstudio.com/download.
VS Code Remote Development
Microsoft now offers extensions that allow you to open any folder in a container, on a remote machine, or in the Windows Subsystem for Linux and take advantage of VS Code’s full feature set. This is a good overview of how remote development with WSL works.
Install the Remote – WSL extension, or the Remote Development extension pack to also install extensions related to containers and remote SSH connections.
Note: At the time of writing this post, Microsoft still considers remote development with WSL 2 to be experimental.
Salesforce Extensions
The Salesforce extensions add the ability to perform some of Salesforce CLI commands directly in VS Code and also add autocompletion and advanced debugging capabilities for Salesforce’s programming languages. To add the Salesforce extensions, click on the Extensions icon in the Activity Bar.
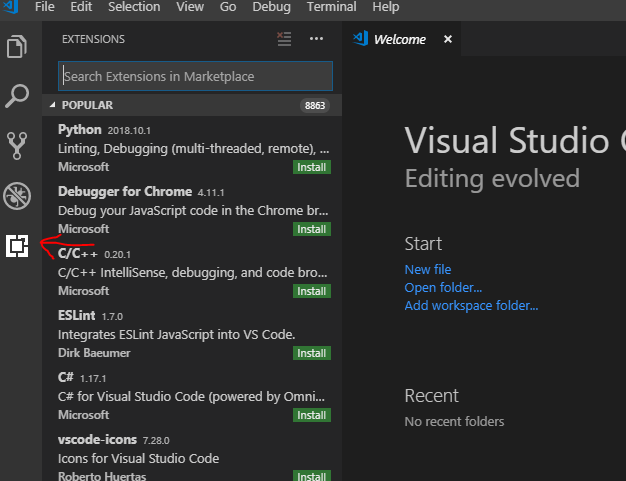
Search for “Salesforce Extension Pack” and click the green “Install” button. This will add a bundle of (currently) eight extensions officially maintained by Salesforce.
Some of the extensions require additional configuration to utilize all of their features:
- Several features, including Apex code completion, running Apex tests and the SOQL builder utilize the Apex Language Server, which is built on the Java platform. Make sure Java is installed in the WSL2 environment and set up in VS Code. This step needs to be completed once and is applied across all projects.
- Run the command to refresh the local sObject definitions with custom objects in your environment to enable Apex code completion. This step needs to be completed for each project and needs to be repeated periodically as the schema changes in the Salesforce org.
- Create a configuration file for the Apex replay debugger. This step needs to be completed for each project.
- You can run Apex tests in VS Code without additional configuration, but there is also an option to retrieve code coverage results for Apex classes and triggers by setting the salesforcedx-vscode.retrieve-test-code-coverage to “true”. This step needs to be completed once per workspace.
Recommended Extensions
In addition to the above extension pack, Salesforce also recommends several other extensions to improve provide better code formatting, syntax linting and static code analysis.
Step 4: Set Up the Integrated Terminal
If you previously set up WSL 1 with VS Code then you just need to update your default WSL distribution to your WSL 2 distro and then click the small double arrow >< green icon in the lower left corner and then select Remote-WSL: New Window. You will now be connected to the Ubuntu file system. Start a new terminal to access your shell in the WSL 2 environment. Alternatively, you can navigate to a file in the WSL 2 environment and use the code command to open that file in a VS Code remote session.
If you haven’t set up WSL with VS Code previously, can can update the "terminal.integrated.shell.windows" setting to point to the executable for WSL ("C:\\Windows\\System32\\bash.exe" in my case).
If you are using zsh, you’ll need to make a few adjustments to the integrated terminal settings:
"terminal.integrated.lineHeight": 1.3,
"terminal.integrated.fontFamily": "DejaVu Sans Mono for Powerline"
If you are using bash, you can customize the prompt as well.
The future release of a full Linux GUI could further simplify Salesforce development using the Windows Subsystem for Linux. In the meantime, VS Code remote development with WSL 2 has significantly simplified Salesforce development on Windows machines.
Resources
- VS Code Documentation: Introductory Videos
- VS Code Documentation: Keyboard Shortcuts
- VS Code Documentation: Development Flow using Remote – WSL
- Salesforce Documentation: Salesforce Extensions for VS Code
- Salesforce Documentation: Salesforce CLI Setup Guide


