This is the second post in a two-part series on how to use Azure Data Studio and Flyway as part of managing a PostgreSQL database pipeline on Heroku. In this post, we will focus on using Flyway to migrate changes to the database schema.
Prerequisites
- Complete the steps in the first post of this series
- Create a free GitHub account
Scenario Recap
We will be creating a database for an animal rescue organization to keep track of animal adoptions. This simplified example will include 4 tables:
- animals: table for storing information about the animals
- animal_notes: table for storing date-specific activity or notes about the animal
- owners: table of people who have adopted animals
- organizations: table of animal shelters from where animals came, if applicable
Manage Schema Migrations
This example uses GitHub and GitHub Actions to manage the pipeline, but the concepts could work with other git hosting and CI/CD services.
Step 1: Create a GitHub and local project
Create a new repository in GitHub and clone the repository to your local machine.
Create a feature branch, for example
git checkout -b feature/animal-schema
Step 2: Create a table in the local database
In order to use Flyway to automatically migrate the schema changes to the databases in the stage and production environments there are a few key requirements. First, the files containing the SQL for the schema changes must be saved in the same folder. Second, the naming convention for the SQL files must follow Flyway’s syntax.
Create a directory in your local git project folder called “migrations”.
Create a new file in the migrations directory named “V1.1__create_animal_schema.sql”. Paste the following SQL into the file and save:
CREATE TABLE organizations (
    org_id bigserial,
    name varchar(100),
    CONSTRAINT org_id PRIMARY KEY (org_id)
);

CREATE TABLE owners (
    owner_id bigserial,
    first_name varchar(100),
    last_name varchar(100),
    email varchar(100),
    phone varchar(15),
    mailing_street varchar(100),
    mailing_city varchar(100),
    mailing_state varchar(30),
    mailing_postal_code varchar(5),
    CONSTRAINT owner_id PRIMARY KEY (owner_id)
);
Connect to your local postgres database in Azure Data Studio and run the above SQL script.
Remember Flyway has specific requirements for the name of the file. Let’s create another SQL migration script with an updated version number. Create a new file in the migrations directory named “V1.2__update_animal_schema.sql”. Paste the following SQL into the file, save and run in your local database:
CREATE TABLE animals (
    animal_id bigserial,
    animal_name varchar(100),
    animal_type varchar(100),
    gender varchar(10),
    birthdate date,
    shelter integer REFERENCES organizations (org_id),
    owner_id integer REFERENCES owners (owner_id),
    CONSTRAINT animal_key PRIMARY KEY (animal_id)
);
Finally, commit the files and push the feature branch to the GitHub repository.
Step 3: Set Up GitHub Branches and GitHub Environment Secrets
We will use a simple pipeline flow for this example where we will push the feature branch to GitHub, then create pull requests to merge the changes into branches that correspond to the Heroku environments and use GitHub actions to deploy to schema changes to the correct Heroku environment.
By default, the GitHub repository comes with a “main” branch. We will use that branch to deploy to the production Heroku environment. Create a branch called “staging” to deploy changes to the staging Heroku environment.
When we run the Flyway migrate command, we will need to pass in the environment-specific credentials in order to connect to the correct Heroku database. In GitHub, navigate to Settings -> Environments and create an Environment called “Staging”. Open the credentials for the Heroku Postgres database attached to the Staging app, then create the following secrets for the GitHub Staging environment:
- DB_Host: copy the value from Host
- DB_Name: copy the value from Database
- DB_Pass: copy the value from Password
- DB_User: copy the value from Host
Next create an environment for Production and add the same secrets, copying the values from the Heroku Postgres database attached to the production app.
Step 4: Set Up GitHub Action for Staging Deploy
Navigate to Actions tab of your repository and create a new action called “ci-staging” and paste the following:
# This is a basic workflow to help you get started with Actions

name: CI Staging

# Controls when the action will run.
on:
  # Triggers the workflow on push events but only for the staging branch
  push:
    branches:
      - staging

  # Allows you to run this workflow manually from the Actions tab
  workflow_dispatch:

# A workflow run is made up of one or more jobs that can run sequentially or in parallel
jobs:
  # This workflow contains a single job called "migrate"
  migrate:
    # The type of runner that the job will run on
    runs-on: ubuntu-latest
    # gives the job access to the secrets and protection settings scoped to the staging environment
    environment: staging

    # Steps represent a sequence of tasks that will be executed as part of the job
    steps:
      # Checks-out your repository under $GITHUB_WORKSPACE, so your job can access it
      - uses: actions/checkout@v2

      # Runs multiple commands using the runners shell
      - name: Set up Flyway
        run: |
          curl -L https://repo1.maven.org/maven2/org/flywaydb/flyway-commandline/7.7.1/flyway-commandline-7.7.1.tar.gz -o flyway-commandline-7.7.1.tar.gz \
          && tar -xzf flyway-commandline-7.7.1.tar.gz --strip-components=1 \
          && rm flyway-commandline-7.7.1.tar.gz
      - run: PATH=/flyway:$PATH
      - run: |
          ./flyway -url="jdbc:postgresql://${{secrets.DB_HOST}}:5432/${{secrets.DB_NAME}}" \
          -user="${{secrets.DB_USER}}" \
          -password="${{secrets.DB_PASS}}" \
          -locations="filesystem:migrations" info \
          migrate
Note that the above workflow file needs to be in the staging branch before you merge the feature branch since it is triggering off of a push to the staging branch. If you created the workflow from the main branch, you can merge the main branch into the staging branch, or cherry pick the commit to the staging branch.
Workflow Highlights
- Runs only when commits are pushed to the staging branch
- Sets the environment to staging, so that the workflow will pull the correct database credentials and prevents accidentally updating the wrong database for the environment
- Installs Flyway and adds to the path of the GitHub Action runner operating system
- Executes the Flyway migrate command
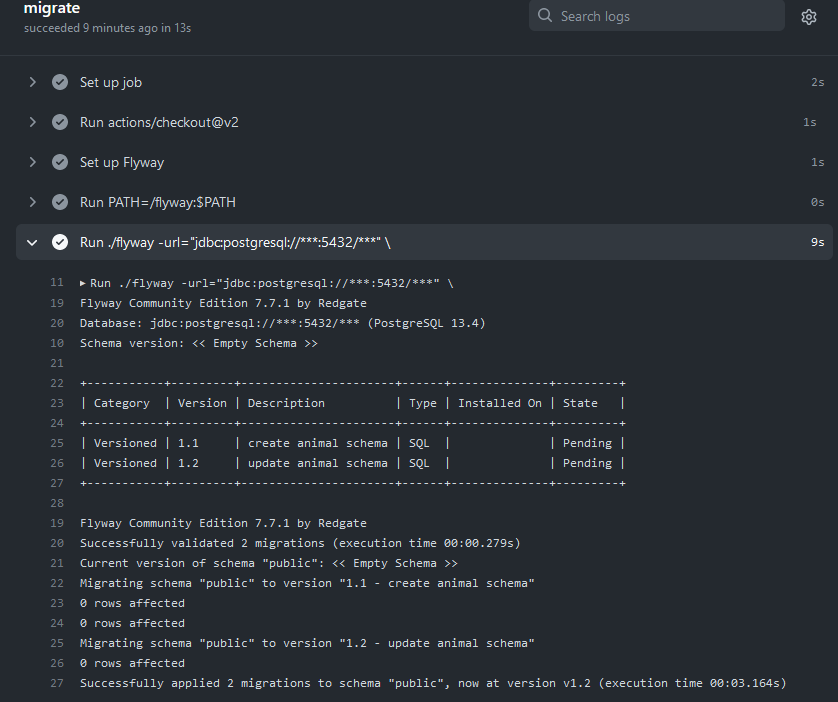
Merge the feature branch into the staging branch. Inspect logs for the job and you should see something like this.
Step 5: Set Up GitHub Action for Production Deploy
The final task is to create the GitHub Action for the production deployment. Navigate to the Actions tab of your repository and create a new action called “ci-main” and paste the following (note that this file needs to be in the main branch before the action will run):
name: CI Main

# Controls when the action will run.
on:
  # Triggers the workflow on push events but only for the main branch
  push:
    branches:
      - main

  # Allows you to run this workflow manually from the Actions tab
  workflow_dispatch:

# A workflow run is made up of one or more jobs that can run sequentially or in parallel
jobs:
  # This workflow contains a single job called "migrate"
  migrate:
    # The type of runner that the job will run on
    runs-on: ubuntu-latest
    # gives the job access to the secrets and protection settings scoped to the staging environment
    environment: production

    # Steps represent a sequence of tasks that will be executed as part of the job
    steps:
      # Checks-out your repository under $GITHUB_WORKSPACE, so your job can access it
      - uses: actions/checkout@v2

      # Runs multiple commands using the runners shell
      - name: Set up Flyway
        run: |
          curl -L https://repo1.maven.org/maven2/org/flywaydb/flyway-commandline/7.7.1/flyway-commandline-7.7.1.tar.gz -o flyway-commandline-7.7.1.tar.gz \
          && tar -xzf flyway-commandline-7.7.1.tar.gz --strip-components=1 \
          && rm flyway-commandline-7.7.1.tar.gz
      - run: PATH=/flyway:$PATH
      - run: |
          ./flyway -url="jdbc:postgresql://${{secrets.DB_HOST}}:5432/${{secrets.DB_NAME}}" \
          -user="${{secrets.DB_USER}}" \
          -password="${{secrets.DB_PASS}}" \
          -locations="filesystem:migrations" info \
          migrate
Workflow Highlights
- This workflow is nearly identical the ci-staging workflow, except it only runs when commits are pushed to the main branch and sets the environment to production.
Summary of the Development Flow
Below are the steps to follow in order to take advantage of source control and migrations for SQL schema management across environments.
- Pull latest changes from GitHub
- Create git branch for the feature
- Connect to local db
- Create a SQL file following Flyway’s file name requirements and save in the migrations folder
- Commit changes and push to GitHub
- Create a pull request and merge into the staging branch
- GitHub Actions will deploy to the staging database
- Create a pull request and merge into the main branch
- GitHub Actions will deploy to the production database
Try following these steps to create the animal_notes table and migrate to the staging and production databases. Create a file named V1.3__create_animal_notes.sql in the migrations directory with the following SQL script:
CREATE TABLE animal_notes (
    animal_note_id bigserial,
    animal_note_summary varchar(100),
    animal_note_detail text,
    animal_note_date date,
    animal integer REFERENCES animals (animal_id),
    CONSTRAINT animal_note_key PRIMARY KEY (animal_note_id)
);
Resources
- GitHub Repository with code from this post
- Microsoft Docs: Azure Data Studio Overview
- Heroku Documentation: Heroku Postgres
- Flyway Documentation: Naming SQL Migration Files
- GitHub Documentation: Environments


