UPDATE 2021: The recommended approach for embedding Tableau visualizations in Salesforce Lighting Experience is to use the Tableau Viz Lightning Web Component.
This post is part of a series that is exploring the capabilities and limitations of various data visualization tools when embedded in Salesforce.
In the previous post, we used Einstein Analytics to embed a dashboard on an Account record. There were a lot of advantages to that approach, but if your organization is already using an analytics solution such as Tableau, you will likely need to figure out how to use that solution to meet the need. Tableau Foundation provides generous donations to nonprofits and has a large nonprofit customer base.
This is an example of how to use a simplified approach of displaying and filtering a Tableau dashboard on record pages in Lightning Experience.
Prerequisites
- Tableau Desktop: if you are working with test data, you can use the free Tableau Public application; if you want to test a more realistic scenario and see the full user experience, including authentication considerations and connecting directly to your Salesforce org, then you will need Tableau Desktop
- Access to Tableau Online or Tableau Server: you will need an environment where you can publish and host the Tableau dashboard online
- Salesforce org populated with data you want to visualize; the example below uses data from the account and opportunity objects. You can create a free developer edition org that is pre-populated with data using this link.
Step 1: Create Dashboard in Tableau Desktop
Open Tableau Desktop and click “More…” under the Connect To a Server section. Click “Salesforce”. This should kick off the OAuth flow. Sign in with the credentials you want to use as the source data for the dashboard. To connect to a sandbox, click the “Use Custom Domain” option and enter the sandbox login URL: https://test.salesforce.com.
After logging in, Tableau will create a new workbook and open the Data Source tab. For this example, we are going to use the Opportunities Standard Connection and let Tableau create the query.
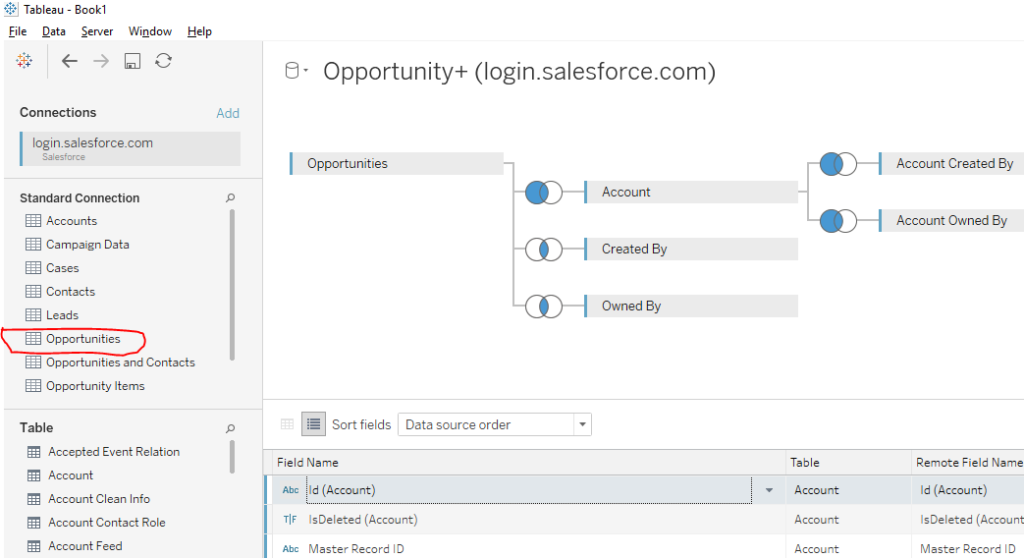
Navigate to the Sheet1 tab to begin exploring the dataset. Tableau Desktop will automatically extract the data based on the standard query we selected.
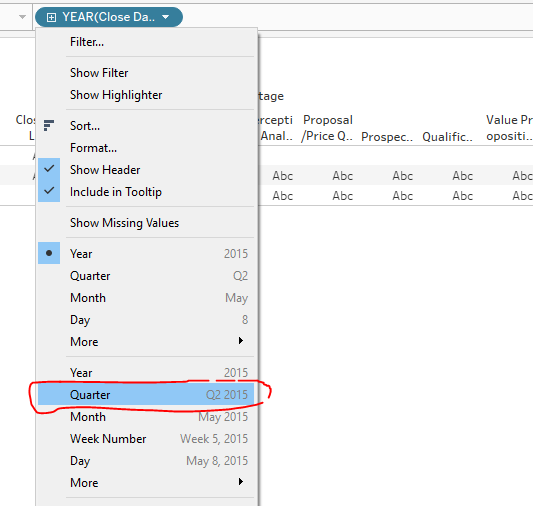
Lets create a basic visualization of the data. Drag Opportunity Close Date from Dimensions to the Columns pane and drag Opportunity Amount from Measures to the Rows pane. Click the carrot on the right of the Year(Close Date) bubble and change the grouping to by quarter and year.
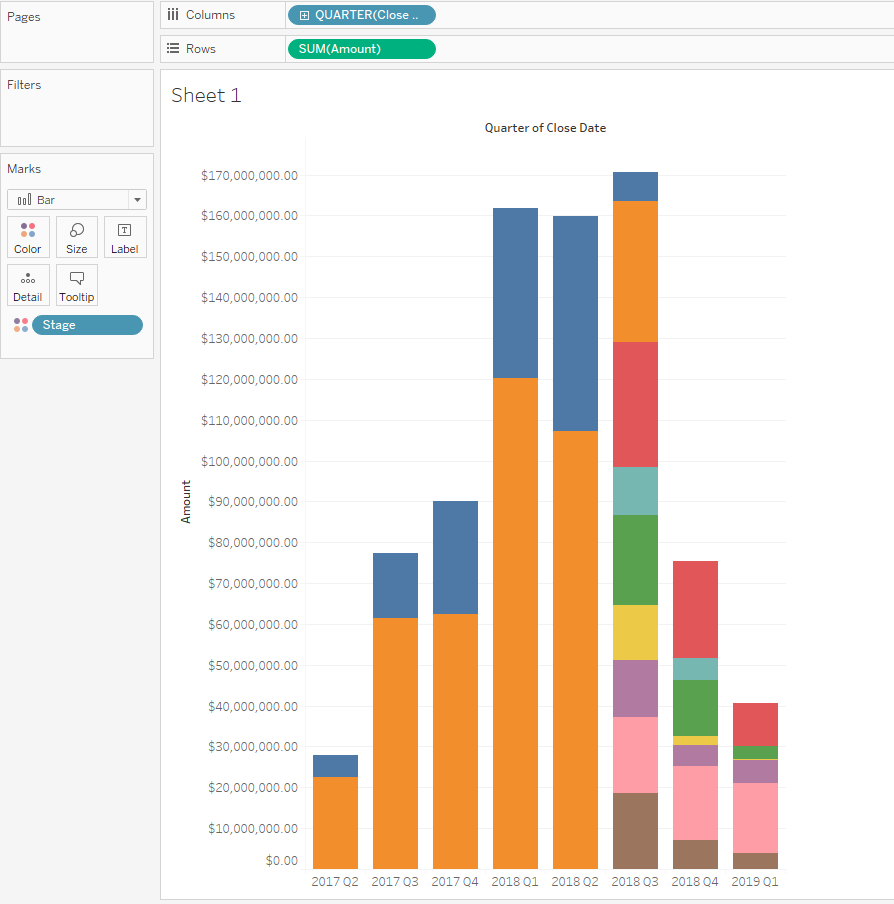
Drag Opportunity Stage from Dimensions to the Marks pane and drop on top of the “Color” icon.Change the chart type to stacked bars. Your chart should look something like this
Let’s create a few filters. Drag the Opportunity Stage dimension onto the Filters pane. In the popup, deselect the “Closed Lost” option to remove lost opportunities from our pipeline. Drag the Account Id dimension onto the Filters pane. Select the filter and choose Apply to Worksheets -> All Using Related Data Sources. We will reference this filter when we embed the dashboard. Apply the same setting to the Stage filter.
Create a dashboard by clicking on the New Dashboard icon next to the active worksheet. Drag the worksheet onto the dashboard and save the workbook. On the dashboard sheet, update the Size pane to “Automatic” so that the dashboard size will adjust to the fill the window used to display it.
Tableau Public Note: If you are using the free Tableau Public desktop application, you will need to export this data from Salesforce and then upload manually as a text (csv) file. You cannot save the workbook locally and will only be able to save the workbook to the Tableau Public site.
Step 2: Publish the Dashboard Online
In order to embed the dashboard in another application, such as Salesforce, it needs to be accessible online via a web browser. You can either publish the workbook to Tableau Server or Tableau Online.
To publish to Tableau Server, click Server -> Publish Workbook. Enter the URl of the server and click “Connect”. Enter your credentials for Tableau Server and sign in. Navigate to the project workspace on the server where you want to save the workbook. Click “Publish”.
To publish to Tableau Online, use https://online.tableau.com as the URI.
Tableau Public Note: If you are using the free Tableau Public desktop application, you can publish the dashboard to Tableau Public by going to Server -> Tableau Public -> Save to Tableau Public. Enter your credentials, give your workbook a name and click “Save”. The workbook, including the data, will be publicly accessible.
Step 3: Embed and Filter the Dashboard in Salesforce Lightning Experience Records
It’s helpful to see the opportunity pipeline across all accounts, but what if account managers want to see this dashboard filtered automatically when looking at a specific account record in Salesforce? To achieve this, we are going to create a Visualforce page that displays and filters the dashboard to only show pipeline data specific to the account record being viewed.
Create a new Visualforce page by Navigating to Salesforce Setup, search for and open “Visualforce Pages”. Click the “New” button, enter “SimpleTableauEmbed” for the name and check the box “Available for Lightning Experience, Lightning Communities, and the mobile app”. Replace the placeholder code with the code below.
<apex:page standardController="Account" showheader="false" sidebar="false">
  <apex:iframe src="[URL FOR TABLEAU DASHBOARD]?:embed=y&:showShareOptions=false&:toolbar=false&:display_count=no&:showVizHome=no&Id%20(Account)={! Account.Id }" height="300px" width="100%" scrolling="true">
  </apex:iframe>
</apex:page>
Navigate to your Tableau dashboard online and click the “Share” button. Copy the value in the link field starting from https:// until the first “?”, but do not include the “?” in your selection. Replace [URL FOR TABLEAU DASHBOARD] with the value you just copied. Save the Visualforce page.
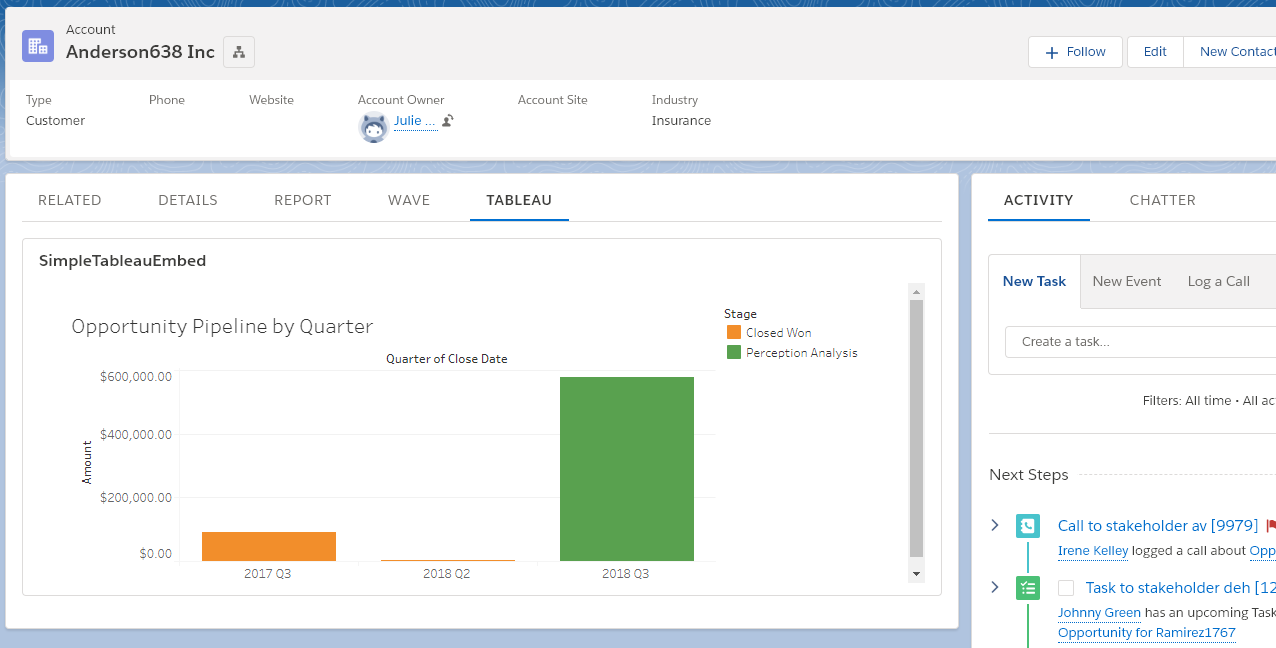
Now we need to customize the Account record page to show the dashboard. Navigate to an Account record in your Salesforce org. Click the gear icon in the top right and select “Edit Page”. This will open the Account Record Page editor in the Lightning App Builder. Click the Tabs (1) component, then the Add Tab (2) button. Select “Custom” (3) for the Tab Label and enter “Tableau” for the Custom Tab Label (4).
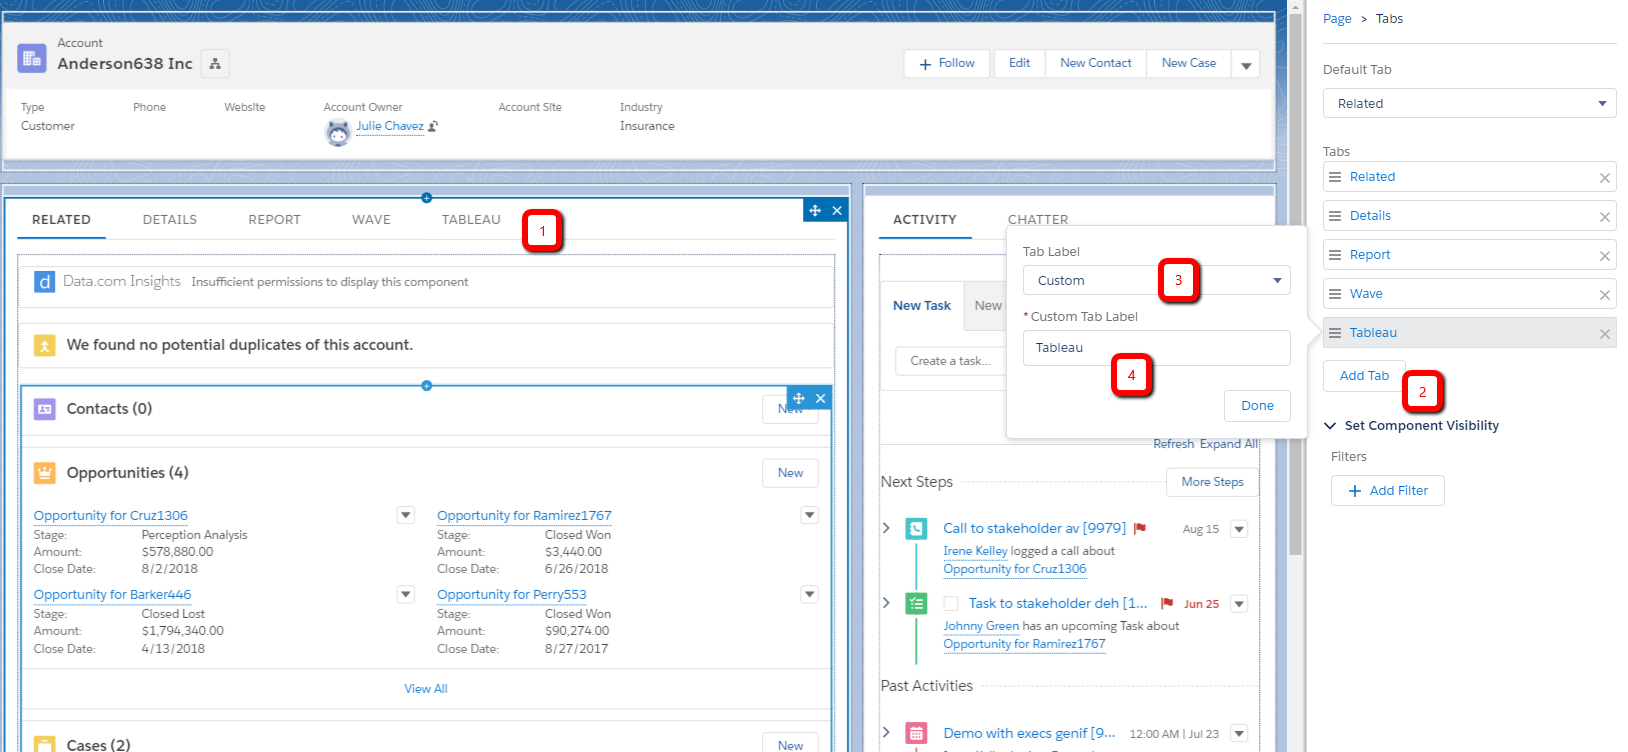
Click the Tableau tab, then drag Visualforce component from the list of Lightning Components onto the page. In the right pane, select SimpleTableauEmbed for the Visualforce Page Name and leave the Height blank to use the default height set by the Visualforce page. Save the Account Record Page and then view an account record to see the filtered dashboard.
Summary
Advantages of this approach include:
- Effort and skills required: Tableau Desktop is a robust tool and harder to learn than Salesforce reports and dashboards, but definitely very accessible. If you are savvy with Excel or other data manipulation tools, you’ll pick it up quickly. This approach also requires very little Visualforce knowledge and creating the UI mashup is pretty simple.
- Multiple devices: Tableau Desktop provides a number of features for design responsive layouts when creating the dashboard. This needs to be specified in Tableau, rather than in the Salesforce application. Custom record page tabs can also be created for the mobile layout, and Visualforce pages can be embedded in mobile cards or in page layouts and viewed in the Salesforce mobile app.
- Look and feel: There are a lots of chart types and options for customizing the styling and layout of charts and dashboards. This seems to be one of the key differentiators for Tableau.
- Large data volumes: Tableau Server/Online can handle very large data volumes.
- Data sources: Tableau supports many connectors to various data sources and data formats. This appears to be a particular strength of Tableau.
- Data model: Tableau provides robust functionality for restructuring and enhancing the data model to support visualization needs.
There are some limitations with this approach
- Accuracy of data: The flip side of being able to handle very large data volumes is that the data is not queried from the CRM in real-time. Data in Tableau visualizations are updated up to every hour so embedded visualizations may not be totally accurate, but hourly might be close enough for your requirements.
- Single sign-on: Assuming you do not already have SSO at your organization, this simple approach requires Salesforce users to log into Tableau Server/Online separately in order to view visualizations. However, it is fairly simple to set up SSO from Salesforce to Tableau Online/Server using Salesforce as the identity provider
- Data security: Tableau typically aggregates data from source systems into a new data set within Tableau and any Salesforce data security settings, such as object and field level security and record-level sharing, are not transferred by default. If your data security model is pretty open, this might not be an issue. For other scenarios, especially embedding in external-facing application pages, re-creating the field and row-level security in Tableau could be a significant effort.
- Deployment process: Source data, worksheets and dashboards are created in Tableau Desktop, then pushed to Tableau Server/Online and live separate from the Salesforce platform. The process for creating/updating embedded assets needs to be coordinated with the process for creating/updating the application page in which they are embedded.
Next post: Embed Tableau Dashboard in Salesforce Records Using Canvas
Resources
- Tableau documentation: Salesforce connector
- Tableau documentation: Publishing a workbook
- Tableau URL parameters for iframe tags
- Salesforce documentation: Lightning App Builder


Does this still work since iframes are not supported anymore?
https://help.salesforce.com/articleView?id=000322792&type=1&mode=1
I can’t get the Filter to pass. Are you supposed to leave all values unchecked in the tableau workbook?