Email Relay refers to sending outbound email from Salesforce through your organization’s email server and then onto the recipient. The primary benefits are improving the likelihood of the email being delivered and a copy of all sent emails are saved to the sent folder of the email account used to send the emails.
This post demonstrates how to set up and test Salesforce email relay with Office 365 (Exchange Online) as the email server.
Prerequisites
- Office 365 account with administrator access. Use your organizational account, or sign up for the Office 365 Developer Program and then start an Office 365 Subscription.
- Salesforce org with system administrator access. Sign up for a free developer edition org here.
Step 1: Set up Mail Flow Connector in Office 365
Configure a test domain (optional)
Before setting up an email relay with your main email domain, it is best to test out the configuration with test environments. You can use a Salesforce developer org and you can purchase (or get a free domain using Freenom) and add a domain to your existing Office 365 account to test the settings. These are instructions for adding a domain to your Office 365 account.
Add an inbound connector in the Exchange Admin Center
In the Microsoft 365 Admin Center, navigate to Admin Centers -> Exchange. This will open the Exchange Admin Center. In the Exchange Admin Center, navigated to Mail Flow (1) -> Connectors (2). Click the “+” (3) to create a new connector. In the pop up window, select “Partner organization” as the From and “Office 365” as the To.
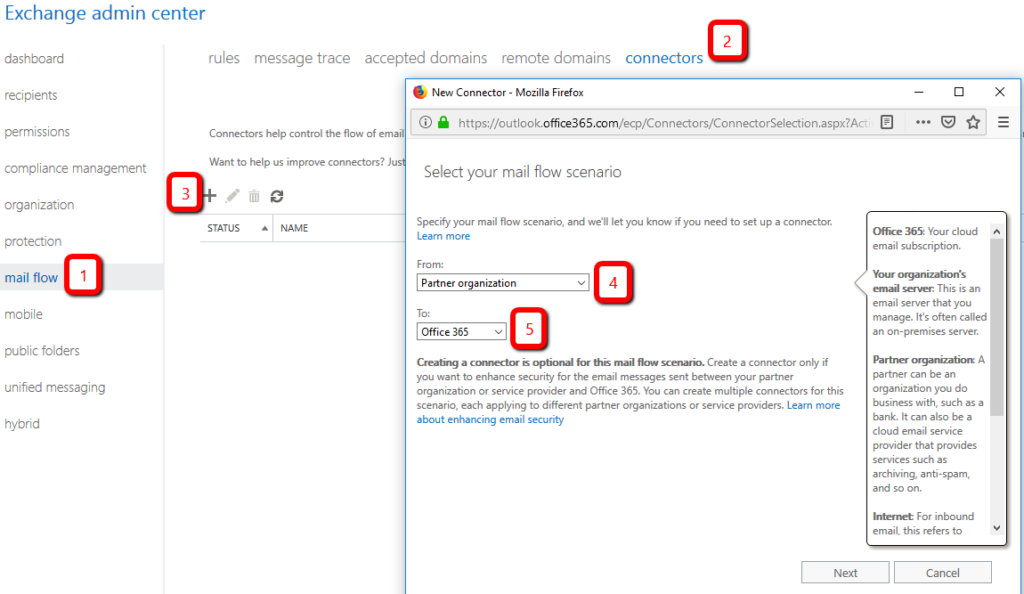
Click “Next” and give the connector a name and description. Click “Next” and select the option to “Use the sender’s IP address” to identify the partner organization.
On the next screen, click the “+” button to add an IP address. Add all of the IP addresses listed in the Email Relay section of this article.
After adding all of the IP addresses, click the “Next” button, and leave the box checked for “Reject email messages if they aren’t sent over TLS”. Click the “Next” button, then review the settings and click the “Save” button.
Step 2: Configure Email Relay in Salesforce
In your Salesforce org, navigate to Setup -> Email -> Email Relays and click the “Create Email Relay” button. Use the following values:
- Host: (should be the value on the MX DNS record for your email domain, typically something like mydomain-com.mail.protection.outlook.com)
- Port: 25
- TLS Setting: Preferred
- Enable SMTP Auth: (unchecked)
Navigate to Setup -> Email -> Deliverability. Under Email Security Compliance, uncheck the box next to “Enable compliance with standard email security mechanisms.” This setting refers to a collection of policies for the values that are set in outbound email headers and this will be handled by Office 365 when the email relay is active.
Step 3: Handle Bounce Management
If you aren’t using the Salesforce bounce management feature, you can skip this step.
If you are sending email from Salesforce via an email relay with the Salesforce bounce management feature enabled, an email security standard called Sender Policy Framework (SPF) will result in a soft fail for emails sent from Salesforce due to a mismatch in authorized sending IP address and the actual sending IP address. Emails that do not pass the SPF validation could be blocked by the receiving email server. See the Bounce Management with Email Relay section in Salesforce help documentation for more info.
There are two options for dealing with this issue.
Option 1: Disable Bounce Management in Salesforce
This is the easiest approach. If you don’t need to use the native email bounce management features in Salesforce, you can turn this feature off by navigating to Setup -> Email -> Deliverability and uncheck the box “Activate bounce management”.
Deactivating Salesforce bounce management will return bounced emails to the Office 365 mailbox, instead of tracking bounced emails with the Salesforce Contact or Lead record.
Option 2: Create a DMARC Policy
Domain-based Message Authentication, Reporting and Conformance (DMARC) is a policy that defines a structured process for email senders and receivers to collaborate around improving mail authentication practices of senders and enables receiving servers to reject unauthenticated messages. DMARC builds on other email authentication protocols – DomainKeys Identified Mail (DKIM) and Sender Policy Framework (SPF) – and requires putting those policies in place as well.
DMARC, DKIM and SPF policies are helpful in improving the deliverability regardless of whether you are using the Salesforce bounce management feature. Follow the steps outlined in improving deliverability of emails sent from Salesforce to set up these policies for your domain.
Step 4: Secure the Email Relay
Due to the multi-tenant nature of both Salesforce and Office 365, there are some additional steps required to secure the email relay. So far you have enabled email sent from a Salesforce org to pass through your Office 365 tenant. The security risk is that without additional controls emails can originate from any Salesforce org.
Every message originating from Salesforce will include a message heard tag with the name “X-SFDC-LK” along with the Org Id of your Salesforce org. Create a mail flow rule to restrict from which Salesforce org relayed emails can originate. Another good control is to only relay email if DKIM passes.
Step 5: Test the Email Relay
In Salesforce, navigate to Setup -> Email -> Test Deliverability. Enter your email address and send a test message.
Open the test email in Outlook. You should not see the “via” next to the email address. Also, note that emails you send via Salesforce will now be in your “Sent” folder in Outlook.
Resources
- Salesforce documentation: Set up Email Relay
- Salesforce documentation: Email Relay with Office 365
- Salesforce documentation: Email Relay Best Practices
- Microsoft documentation: Connectors with Advanced Security
- Microsoft documentation: Create mail flow rules


Hi, thanks for the article.
Is this setup useable for sending mails also to domain externals?
Hello there!
Could you explain Step 4 on how you created the mail flow rule in Step 4: Secure the Email Relay?
We are trying to do this for our org and not sure on the logic for interrogating the header and routing the email.
Thanks!
Hi, same question here about securing the email relay. Can I make a rounting filter on X-SFDC-LK on a parnter connector?
Will Exchange Online add a DKIM to the emails relayed to the internet through a partner connector.
So we don’t (or can’t) add a DKIM within Salesforce and to make delivery to the internet (other domains then ourselves) more stable without arriving in the spam folder.
So we want to route all emails with a sender like @ourdomain through Office 365 without other salesforce tenant would be able to this as well off course.
Thanks in advance