VS Code is a great free IDE with an extension marketplace bringing additional functionality, including IntelliSense for Salesforce development, Apex debugging, tools for creating Lightning Web Components and much more.
This post demonstrates how to set up VS Code in Windows and use the Windows Subsystem for Linux (WSL) terminal as the integrated terminal. The goal is to be able to take advantage of developing with the Salesforce CLI in a bash terminal within VS Code installed in Windows.
Prerequisites
- Git is required in the Windows environment in order to support the native VS Code functionality related to version control.
- Java 8 SDK is required in the Windows environment to support Salesforce VS Code extensions. Note that that at the time of writing the post Java 8 (not a later version) needs to be added to the Path in Windows.
- Salesforce CLI installed and configured in the WSL environment. We will use WSL as the integrated terminal in VS Code.
Step 1: Install the Salesforce CLI in the Windows Environment
The Salesforce extensions for VS Code require the Salesforce CLI installed in the Windows environment. Download and run the installer for the Salesforce CLI for Windows. Open PowerShell and test the installation.
# Verify that the CLI installed correctly
sfdx --version

# verify the Salesforce CLI plug-in version
sfdx plugins --core

# if you installed the Salesforce CLI previously, verify that you have the most recent version
sfdx update
Step 2: Install VS Code and the Salesforce Extensions
Download and install VS Code for Windows: https://code.visualstudio.com/download.
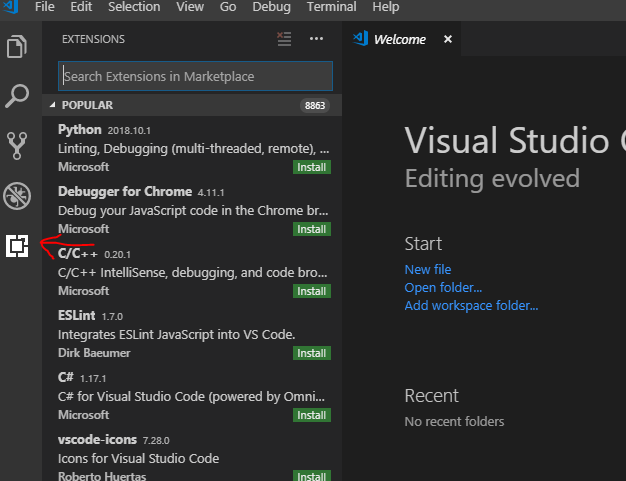
The Salesforce extensions add the ability to perform some of Salesforce CLI commands directly in VS Code and also add Salesforce programming language IntelliSense and advanced debugging capabilities. To add the Salesforce extensions, click on the Extensions icon in the Activity Bar.

Search for “Salesforce Extension Pack” and click the green “Install” button. This will add a bundle of (currently) six extensions officially maintained by Salesforce.
To develop Lighting Web Components, search for and add the Lightning Web Components extension from Salesforce as well.
Step 3: Enable WSL Bash and PowerShell Options in the Integrated Terminal
At the time of writing this article, VS Code allows you to customize which terminal is used when launching the integrated terminal via user settings, but you have to choose just one terminal. In order to work with Salesforce CLI commands in VS Code installed in the Windows environment and also in the Bash terminal installed in the WSL environment, it is helpful to be able to choose the PowerShell terminal when authenticating Salesforce orgs to work with VS Code commands and a Bash terminal for scripting and more heavy duty use of the Salesforce CLI commands.
There is an extension that can enable this with a small amount of customization. In the Extensions Marketplace, search for “Shell launcher”. Click the green “Install” button and reload VS Code to activate the extension.
Open the keybindings.json file by navigating to File -> Preferences -> Keyboard Shortcuts. Then click the “keybindings.json” link at the top of the Keyboard Shortcuts file. Replace the square brackets with the following
[{
    "key": "ctrl+shift+t",
    "command": "shellLauncher.launch"
}]
Feel free to modify the value of “key” to your preferred keyboard shortcut.
Next, modify the settings file to include options for PowerShell and WSL Bash. Navigate to File -> Preferences ->Settings. On the top right of the Settings file, click the … option and select “Open settings.json”

Add the following code to the settings.json file
{
    "shellLauncher.shells.windows": [
        {
            "shell": "C:\\Windows\\System32\\WindowsPowerShell\\v1.0\\powershell.exe",
            "label": "PowerShell"
        },
        {
            "shell": "C:\\Windows\\System32\\bash.exe",
            "label": "WSL Bash"
        }
    ]
}
Note that these are the paths to the executable files for the terminals you want to enable. The key is to make sure you have the correct file path for your machine.
Now when you use the keyboard shortcut ctrl+shift+t a window pops up and you can select to open a bash or PowerShell terminal within VS Code. You can even do this multiple times and have multiple terminals running at the same time.

Just remember that while you can interact with the same source files with VS Code commands and with either terminal, VS Code and PowerShell are running in Windows and WSL bash is running in a separate environment.
In order to push or pull changes with a Salesforce org using the VS Code command palette, you need to authenticate that org in the Windows environment (with PowerShell, etc.) and in order to push or pull changes with the same Salesforce org using WSL bash, you need to authenticate that org in the WSL environment. Don’t forget to maintain the list of orgs you are working with in both of those environments!
Where to Go Next
Learn VS Code: there are lots of productivity tips and tricks in the core functionality
Explore the extensions marketplace: these are some of the extensions I’ve found most useful
- GitLens: enhances the native git capabilities with line-by-line authorship details, file history and other useful information from git
- ESLint: static code analysis and auto fixing for JavaScript code
Resources
- VS Code Extension Marketplace: Salesforce Extension Pack
- VS Code Extension Marketplace: Shell launcher
- Salesforce Webinar: VS Code for Salesforce Developers


